This walkthrough is designed to show users some interesting ways to use the command line and set it up in a way that makes it most comfortable.
Getting Started
In order to follow the steps exactly as described in this tutorial you will need the following:
- A personal computer with an ssh client
- An ssh connection to a server (HPC, standalone, etc)
- optional: a VPN connection to the network where the remote server is hosted.
What is a Unix Environment?
A Unix environment is composed of three components:
1) The kernel: this is the master control program of the operating system. This handles everything that make a computer a computer, such as I/O streams, booting, peripherals, etc.
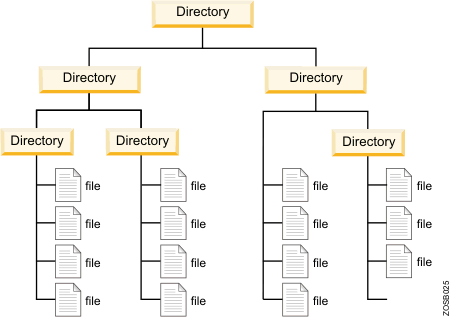
2) File system: this is a hierarchical file system. This is the system in which the operating system keeps track of all the files and folders it needs in order to function. An example filesystem is seen in the figure below:
3) The shell aka. terminal, command prompt: This is the interface between the user and the kernel. The main purpose of the shell is to take a command or series of commands and sends them to the kernel to be processed into a set of instructions. This is place where you will spend most of your time analyzing data, so may as well make it comfortable for you to work in, which is the main objective in this tutorial.
.bashrc, .bash_profile, and .profile files
Each if these files could be considered a config file – they all help in making your terminal environment the way you want, though each has a particular purpose within the shell. Each of these are found in your home directory (/home/$USER/) which we will access via the shortcut ~ or ~/, which just saves you from having to type the full path to your home directory.
A note about hidden files: as you may have noticed, there is a preceding . in front of the filenames. This is Unix/Linux notation to hide a file by default when looking into a directory. This is because you most likely won’t want to see these files every time you ls your home directory (they can start to clutter things) but also because these are generally very important files that are critical to the way your account functions, so tampering with these by mistake could be very serious. In order to view them, you can run ls -a which will list everything in the directory. To access them, use the complete filename, including the ..
.bashrc
This is the main file where you’re add most of your configurations, such as aliases, PATH variable, color schemes, etc. Unlike the other configuration files, this affects every terminal instance as opposed to only the login shell, which is handled by `.bash_profile’.
A few things that are defined in this file are:
* set the $PS1 variable, which displays hostname and current directory
* set the $PATH variable (discussed below)
* aliases
* history settings
IMPORTANT: this file should never output anything! You will run into some very frustrating situations if it does.
.bash_profile
This handles the login nodes, i.e. as soon as you ssh or log into a computer, this is the file that gets loaded. The reason being is that sometimes you want to view diagnostics of the machine that you’re logging into (how long has it been running, are there any updates that need to be installed, etc.) which you wouldn’t want to see in every other terminal instance. Unfortunately this does not have the same settings as the .bashrc file, so your path will not work unless you load your .bashrc file from within. To do so, you can add the following lines to your .bash_profile file (it may already be there, so check before you add this):
if [ -f $HOME/.bashrc ]; then
        source $HOME/.bashrc
fi

# likewise for .profile
if [ -f $HOME/.profile]; then
        source $HOME/.profile
fi
.profile
This file isn’t used very often, however one thing to note: anything that should be available to graphical applications or sh MUST go here.
TMUX Session
Tmux is a terminal multiplexer that enables a number of terminals (or windows) to be created inside a single terminal window or remote terminal session. It is useful for dealing with multiple programs from a command-line interface, and for separating programs from the Unix shell that started the program. For the full set of features please check the man page or this handy cheatsheet.
To get started, ssh into your server:
ssh user@server
IMPORTANT: If you are using Dalma, please note that tmux is not installed on this system. Please skip to the next section of this tutorial or find another server to test this on.
To start a tmux sessions:
tmux
Or, you can name the tmux session to help keep things organized. In this example, the tmux session we will use is named ‘test’:
tmux new -s test
To detach from a tmux session (log out of the session but keep it running) press ctrl+b then d
To see existing sessions on you account
tmux ls # or tmux list-sessions
NOTE: your tmux sessions will not appear if you are not on the same login node they were created on. For example, prince has log-0 and log-1. A tmux session created on log-0 will not be accessible to that on log-1 and vice versa. Please see the session on setting up your ssh alias below.
To log back into your tmux session:
tmux attach
Or, of you have multiple sessions:
tmux attach -t # or test, in the case of this example
Script Command
The script command is a way to log and replay the commands that were entered during a script session. This is useful for sharing workflows and keeping track of what has been done.
While in a tmux session, start a script session to begin logging you commands and name it test_commands:
script test_commands
To end a script session and dump the commands into a file type exit or ctrl+d. The results will be saved into a folder named test_commands within your working directory. If no filename was entered provided they will be saved to a file name typescript.
To append to an existing script file:
# in this example, filename is test_commands
script -a
Downloading, Compiling, and Adding Software to the $PATH
Download and Compile
There are often times when us users do not have sufficient permissions to install software on a server so then we have to wait for someone with permissions to do it for me. As a workaround, you can download and compile (NOT install), and run packages yourself.
The first step is to grab the package you’re interested in. We can use this using wget, curl, or git clone. In this example, we will grab BWA using git clone. This will download the BWA source code into the current directory (it is good practice to compile all of your software into one directory, say /scratch/$USER/software). Once it is done, we can compile the software using make. There are other ways to compile software, but this is one of the more common ways so we will stick with this.
# Download the repository using git
git clone https://github.com/lh3/bwa.git

# change into the bwa directory
cd bwa

# compile using mak
make

# once it is done, you can try to run it bwa
./bwa

# You should see the help output from bwa.
# If you do then it works! If not, you may need to make the `bwa` binary file executable using `chmod +x ./bwa`
PATH Variable
Now that we have it running, we can continue in our analysis. However, it’s pretty annoying that you have to write /scratch/$USER/software/bwa/bwa every time you want to run BWA; why can’t we just type bwa like all the other commands (ls, pwd, cp)? Afterall, it is a command, isn’t it? Well, in fact you can! This is where the PATH variable comes into play. For normal, distributed commands (such as those above) the path variable points to a directory that holds the binary executable files in it, telling your user account where to find them. So, if we print the $PATH variable:
echo $PATH
/opt/local/bin:/usr/local/sbin:/usr/local/bin:/usr/sbin:/usr/bin:/sbin:/bin:/usr/games:/usr/local/games
You might see something like this, a list of directory paths, separated by :. If we ls one of those directories, say /bin:
ls /bin
bash          bzmore  dir        fuser   kill        lsblk   nc.openbsd    ntfsfix   pwd        sh            systemd-inhibit         uname       zfgrep
bunzip2       cat     dmesg      fusermount  kmod        lsmod   netcat        ntfsinfo  rbash      sh.distrib        systemd-machine-id-setup    uncompress      zforce
busybox       chacl   dnsdomainname  getfacl     less        mkdir   netstat       ntfsls    readlink   sleep         systemd-notify          unicode_start   zgrep
bzcat         chgrp   domainname     grep    lessecho    mknod   networkctl    ntfsmove  red        ss            systemd-tmpfiles        vdir        zless
bzcmp         chmod   dumpkeys       gunzip  lessfile    mktemp  nisdomainname     ntfstruncate  rm     static-sh         systemd-tty-ask-password-agent  vmmouse_detect  zmore
bzdiff        chown   echo       gzexe   lesskey     more    ntfs-3g       ntfswipe  rmdir      stty          tailf               wdctl       znew
bzegrep       chvt    ed         gzip    lesspipe    mount   ntfs-3g.probe     open      rnano      su            tar                 which       zsh
bzexe         cp      efibootmgr     hciconfig   ln      mountpoint  ntfs-3g.secaudit  openvt    run-parts  sync          tempfile            whiptail    zsh5
bzfgrep       cpio    egrep      hostname    loadkeys    mt      ntfs-3g.usermap   pidof     rzsh       systemctl         touch               ypdomainname
bzgrep        dash    false      ip      login       mt-gnu  ntfscat       ping      sed        systemd       true                zcat
bzip2         date    fgconsole      journalctl  loginctl    mv      ntfscluster       ping6     setfacl    systemd-ask-password  udevadm             zcmp
bzip2recover  dd      fgrep      kbd_mode    lowntfs-3g  nano    ntfscmp       plymouth  setfont    systemd-escape    ulockmgr_server         zdiff
bzless        df      findmnt        keyctl  ls      nc      ntfsfallocate     ps        setupcon   systemd-hwdb      umount              zegrep
These are a lot of the commands you use on a daily basis in the terminal (ls, pwd, cp). The $PATH variable is how your account can keep track of what commands to provide your user as different users have different setups, privileges, software, etc.. So now that we have a folder called software where we’re going to house all of our compiled software, we can tell the $PATH variable to look into our software directory for binaries that we would like in our path so that we may access them from anywhere within the filesystem. If a file is executable then that and it resides in one of the paths in our $PATH variable, it can be executed from anywhere.
To do this, we need to append to the path (either the full or relative are fine) to the $PATH variable. IMPORTANT: Make sure that you follow the commands exactly and not overwrite the $PATH variable but append to it. If you overwrite it, the operating system will not be able to find any of the necessary commands since their paths will not be found in the $PATH variable.
There are two ways to add the new path to the $PATH variable:
# To append to the path variable for the current session only (until you log out)
export PATH=$PATH:/scratch/$USER/software/bwa

# To verify, you can use print your $PATH variable to see if it now contains the new path
echo $PATH

# To permanently add a path to your you will need to make this edit in your `.bashrc` file
vim ~/.bashrc

# Then at the top add the same command we used above and then save and quit
export PATH=$PATH:/scratch/$USER/software/bwa

# To reload your terminal environment with these new changes we will need to `source` the `.bashrc` file
source ~/.bashrc

# Now if you try to run `bwa` it should work. If not, then try logging out of the of your session and log back in
bwa

# If you get the same output as ./bwa from the previous step, then congratulations!
Command History
Now that you know how to edit and reload the .bashrc file, we should go ahead and make some more changes that may be convenient for you.
It is common practice to search your command history to see all the commands that were executed previously on your account (you can do so with the history command or search with ctrl+r). However, what if you enter 100,000 commands? Most accounts won’t remember that many by default, they will only remember the last 1000, even if some commands are redundant. To change this to store all commands (or nearly all), you can add these lines to the .bashrc file:
vim ~/.bashrc

# Removes duplicated commands and doesn’t store commands that start with a space
HISTCONTROL=ignoreboth
Sets the filesize (chances are you won’t fill this up for several years)
HISTFILESIZE=10000000
Number of lines that are store in memory while your session is ongoing
HISTSIZE=100000

# save and quit and then source the file
source ~/.bashrc
Aliases
Aliases are a way to rename commands or strings of commands. A common example is ssh; many analysts log into a server on a daily basis:
ssh -X at120@prince.hpc.nyu.edu
This is something I use on a daily basis. It may seem like not too much to type, but it does get annoying doing it every day. To make this more succinct, we can create an alias named something shorter which, when executed, will execute the ssh command. This is done in the .bashrc file as well. So open it up and add these lines:
# NOTE: you can change the server to any other server you'd like, you do not have to use prince.hpc.nyu.edu
# Also NOTE: you can change $USER to whatever username you use for that server.
# For example, my laptop user is alan, but my hpc user is at120. So for this example I would use at120 instead of $USER
alias prince='ssh -X $USER@prince.hpc.nyu.edu'

source ~/.bashrc
Now you should be able to ssh into the server with just the command prince.
BUT I STILL NEED TO ENTER A PASSWORD! Is there a way to skip that part, too? Yes.
Password-less SSH
Believe it or not, this is a significantly more secure way to access other computers. However, that’s not the point of this section. In this section we’ll simply show briefly how it works and how to set it up.
The first step is to create a signature for your account, so that when you ssh into a computer it knows who you are and will let you in without prompting for a password. This is called the RSA key. You may already have one; they are stored in the ~/.ssh folder. If that folder doesn’t exist then create it:
# To make the .ssh directory
mkdir ~/.ssh # only do this if you do not have an .ssh directory in your home directory already!

# Then ls the .ssh directory to check to see if you have an RSA key already. It will be in the id_rsa.pub file. Your directory, if it exists, may look something like this
ls ~/.ssh
config  id_rsa  id_rsa.orig  id_rsa.pem  id_rsa.pub  id_rsa.pub.orig  keras-workshop.pem  known_hosts

# If id_rsa.pub exists, then skip the command immediately below.
# If it does not exist, we can create an and RSA key with the following commands
ssh-keygen -t rsa
# Press enter all the way through, even when it prompts for a password!

# To verify, ls the directory and see if id_rsa.pub is now there
ls ~/.ssh
Now what we want to do is give our public RSA key to the server you’re going to access (presumably the one your use to create your alias for!). We can do that with a slightly sophisticated command (but don’t worry, you’ll learn what it means in one of our later posts 😉
# This command appends your signature to the authorized keys file on the server, which is a list of signatures that it recognizes.
# NOTE: You will have to enter your password at this step.
cat ~/.ssh/id_rsa.pub | ssh at120@prince.hpc.nyu.edu ‘cat >> .ssh/authorized_keys’

# Once the transfer is complete, try running your alias
hpc
Hopefully now you can login without being prompted for a password!