De novo genome assembly using BioX-Workflow and HPC-Runner
Assembling a de novo genome involves multiple steps, software, and parameters. There is no single approach, however, producing a “first draft” assembly should, at the very least, address,
- Pre processing and QC.
- Assembling using multiple tools/parameters (at least 2 or 3).
- Assembly metrics comparison.
- Assembly validation.
- Annotation of final “first draft”.
As you can see, this will involve multiple submission scripts, SLURM submissions, as well as a significant amount of editing scripts, which can be prone to human error. Instead, we will be using the NYUAD Core Bioinformatics workflow system to automate this process.
In order to complete this exercise in time, the SPADES assembly has already been precomputed for you (it can take 3-3.5 using this dataset). However, we will still use this precomputed assembly in the assessment and validation stage.
Guessing which kmer size works best for a given dataset is exactly that, GUESSING! As, such you will randomly choose 2 kmer sizes (and ideally, you should choose multiple kmers usually at 6 step intervals, i.e. 21, 27, 33, 39 etc.). You will then be asked to work in groups of 3 and use what you have learned to select the best performing assembly.
Finally, we will annotate our assembled genome online using PATRIC.
Below is an overview of the entire workflow,
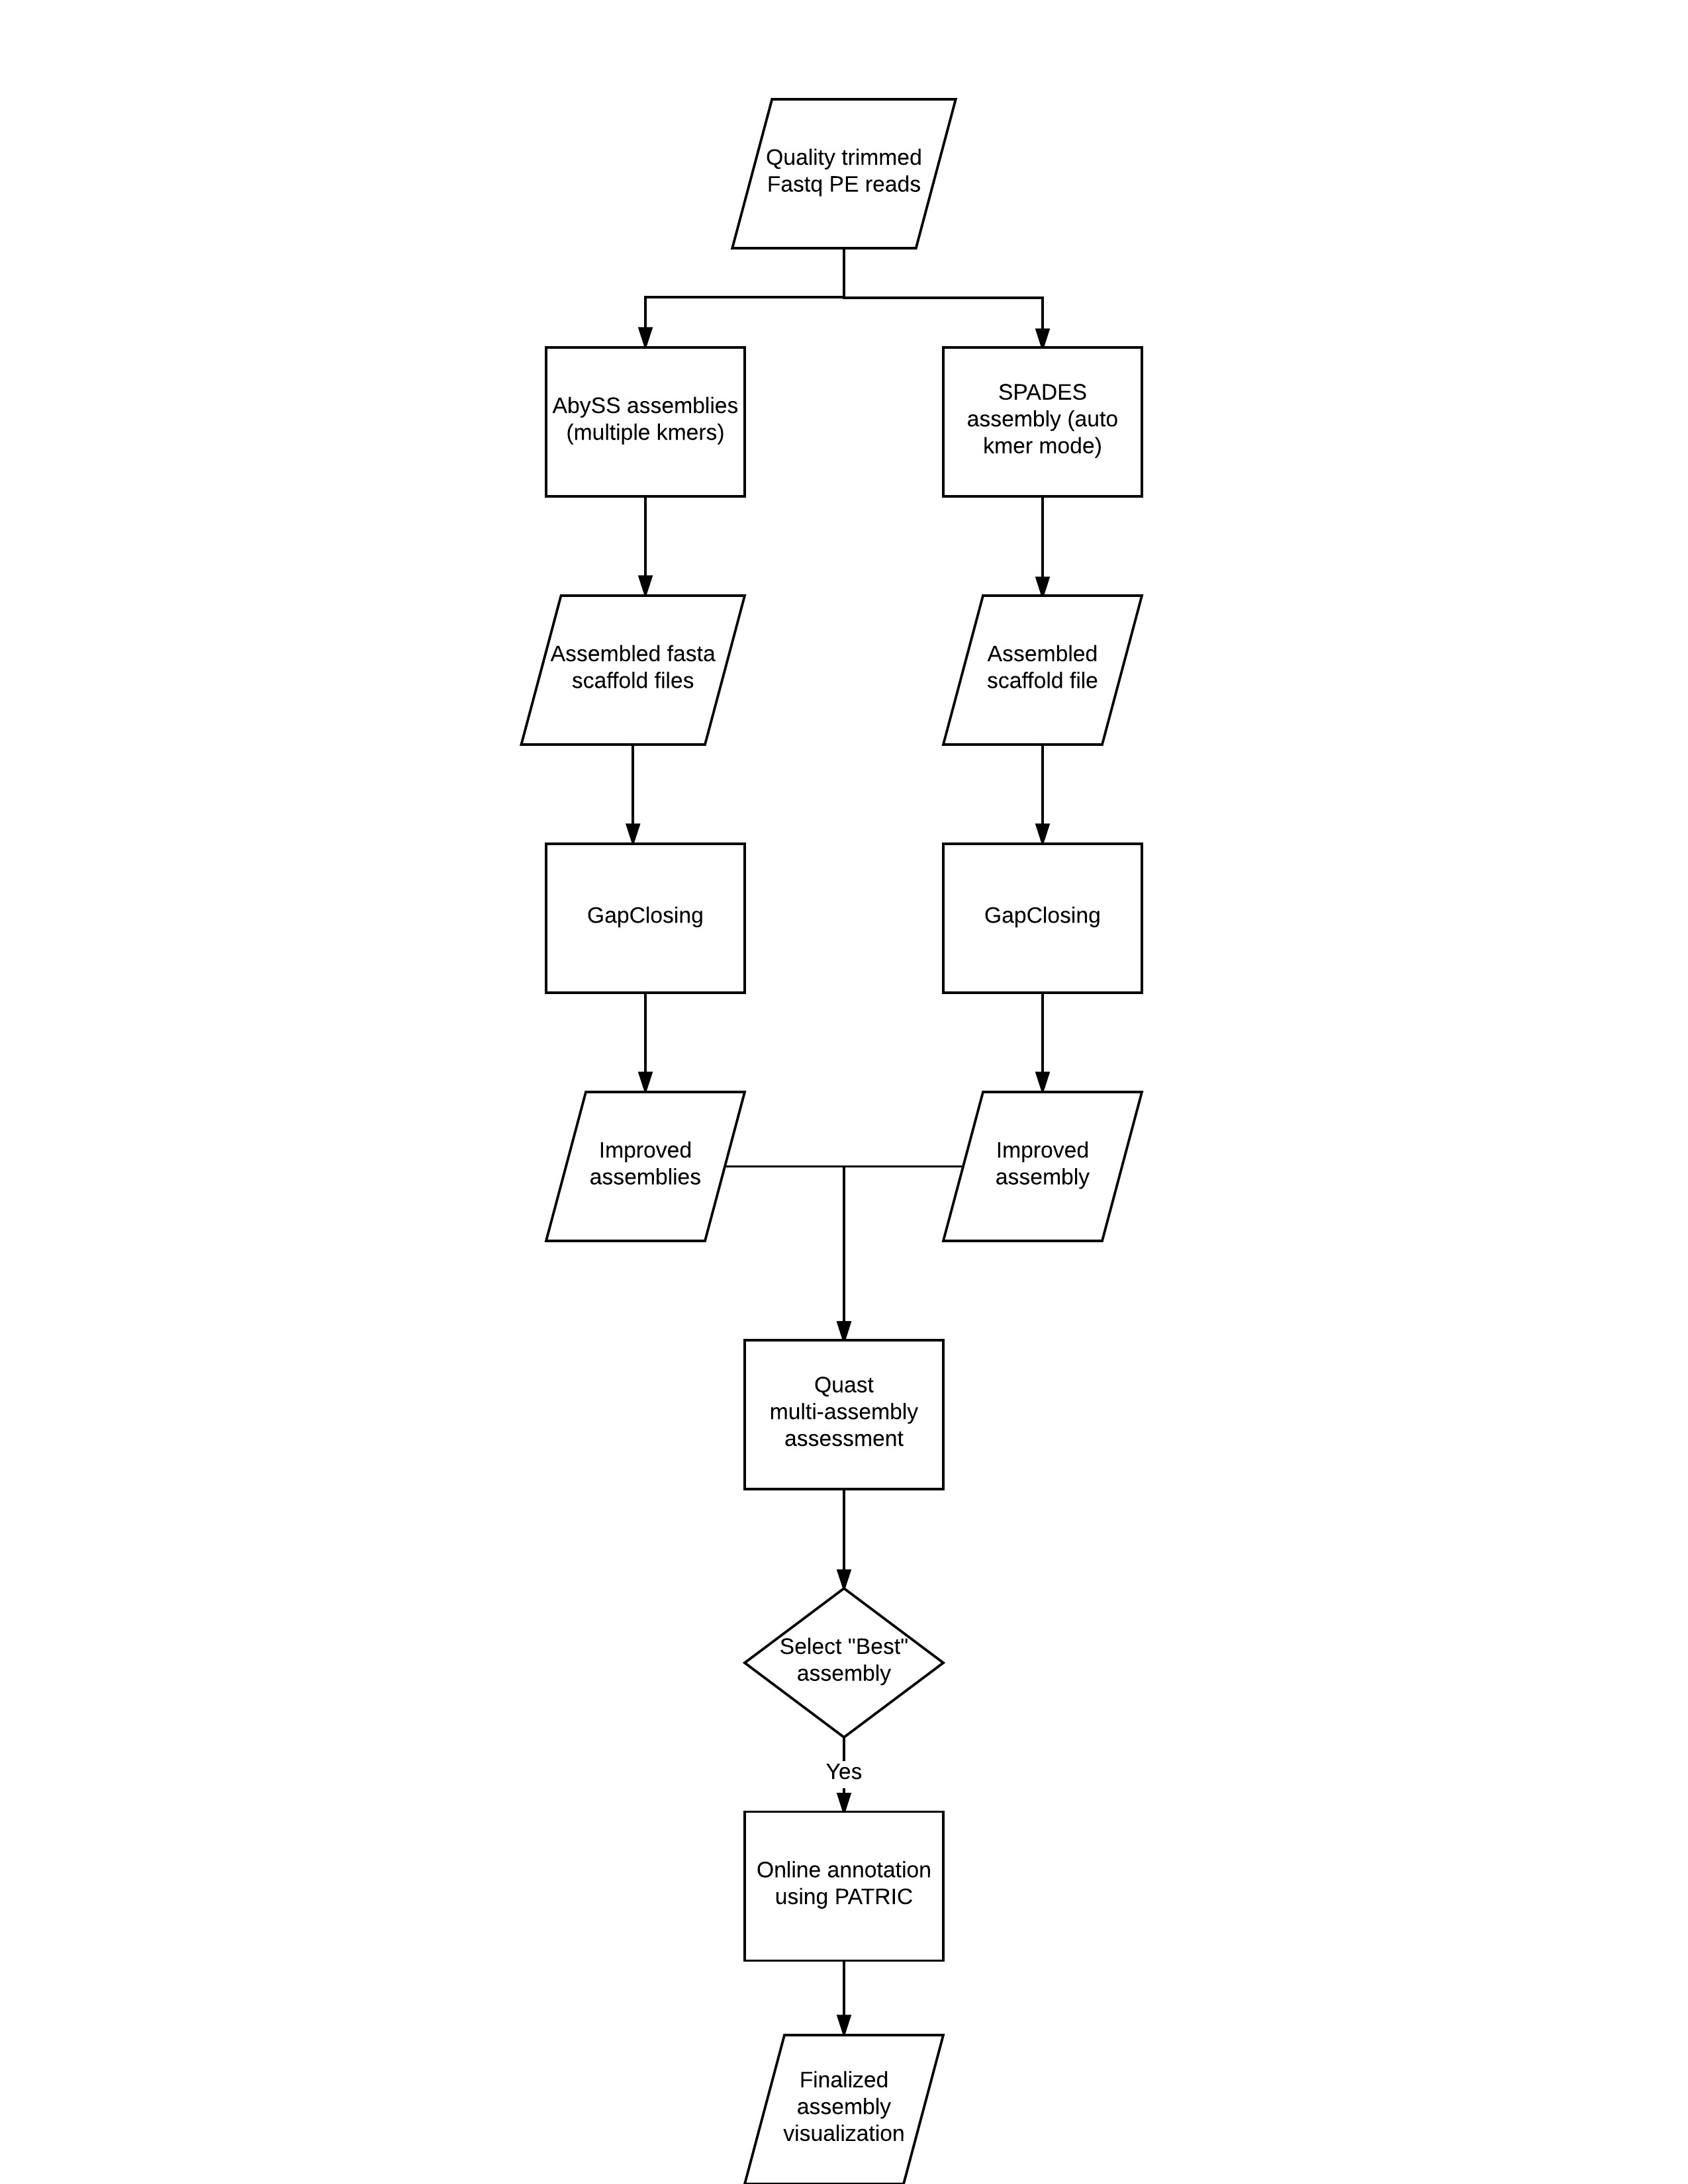
(IMPORTANT UPDATE TO THE ABOVE: We will not run the core prokaryotic gene finding in QUAST, instead we will be using BUSCO. In addition, although we provide information on how to use PATRIC, given the number of participants, this will likely lead to problems uploading our data to PATRIC. Instead, we will show you how to perform the annotation step).
The workflow
Step 1: Getting the data
We will be using the HPC for this analysis, so start by,
- Open a terminal.
- ssh into dalma
ssh yournetid@dalma.abudhabi.nyu.edu
- cd into your $SCRATCH
- Copy the de_novo.tar.gz to your scratch directory
cp /scratch/gencore/datasets/de_novo_genome.tar.gz .
- Untar it
tar -xvf de_novo_genome.tar.gz
- cd into the de_novo_genome directory
cd de_novo_genome
Step 2: Editing the workflow and understanding the software parameters
We will need to edit the workflow file in the “conf” directory called “de_novo_sequencing_training.yml”. You can use atom for this task.
We have 3 tasks that we want to achieve at this step,
- Specify a kmer parameter for abyss.
- Understand what parameters we are providing to each software.
- “Draw” the relationship between all the software in this analysis pipeline (or workflow).
Our dataset is a standard PE library of a bacterial genome. Let’s have a look at the the help menu of SPADES and ABySS to see if any other parameters should be used. You can either run the defaults, or feel free to experiment using other parameters that “make sense”.
In order to understand what the software parameters are, we need to see the “help” menu for these tools.
- In your terminal, load the following modules
module load gencore
module load gencore_de_novo_genomic
- Type the name of the software (or supply the -h/–help flag), e.g. “spades.py -h”.
This should now make it easier to understanding what we are asking the software to do at each step. Once we have modified and saved our workflow, we are ready to proceed to the analysis step.
(For a breakdown of the parameters used in the execution of the software, please refer to the “Individual commands of the assembly workflow” section of the gitbook).
Step 3: Submitting the analysis workflow
Now we are ready to submit our workflow to the scheduler (SLURM). First we will create the execution script using the workflow file (yml) with biox. Then, we will submit the workflow to the scheduler using the hpcrunner.pl script.
(Make sure you are at “/scratch/$USER/de_novo_genome_assembly”)
module load gencore_dev

biox run -w conf/de_novo_sequencing_training.yml -o yourNetId_denovo.sh

hpcrunner.pl submit_jobs --infile yourNetId_denovo.sh --project yourNetId_denovo
Let’s check the status of the SLURM jobs using the SLURM commands (refer to the SLURM Cheatsheet).
(Note: Depending on the number of people submitting this task, this might take a while for everyone’s jobs to finish, so it’s a good time for a coffee break. But don’t worry, we will supply you with pre-computed results if you need them).
Step 4: Examining the output
Let’s start navigating through the analysis directories (before and after gap-closing) and get some basic assembly statistics. We will be using abyss-fac to produce the assembly metrics.
cd /scratch/$USER/de_novo_genome_assembly/data/analysis/Sample_test/
ls -l
cd abyss_pe/Abyss_k(Kmer_size)/
abyss-fac -s 500 Abyss.assembly-k(Kmer_size)-scaffolds.fa
We have used 2 different assemblers for this analysis, SPADES and ABYSS. In reality, you will need to test multiple parameters and additional assemblers.
But for now, let’s visualize the metrics for these 2 assemblies. We can do that using Quast. So navigate to the “quast” directory and copy it over to your local computer.
Let’s look at some of the HTML reports and inspect how our assemblies look.
Q: Something is missing from these reports though right?
A: Yes, we have no information on core genes found in our assembly, but don’t worry, we can use BUSCO for that.
Step 5: Running BUSCO on the assemblies
Here is how to run BUSCO on both of our assemblies,
cd $SCRATCH
cd de_novo_genome/data/analysis/
mkdir busco
cd busco

cp -r /scratch/gencore/.local/easybuild/software/gencore_annotation/1.0/config/ .
export AUGUSTUS_CONFIG_PATH="/scratch/YOUNETID/de_novo_genome/data/analysis/busco/config"

cp ../Sample_test/abyss_pe/*/*scaffolds.fa abyss_scaffolds.fa
cp ../Sample_test/spades/scaffolds.fasta spades_scaffolds.fa

busco -i abyss_scaffolds.fa \
-o busco_abyss -m geno \
-l /scratch/gencore/datasets/busco/bacteria_odb9/ \
-c 12

busco -i spades_scaffolds.fa \
-o busco_spades -m geno \
-l /scratch/gencore/datasets/busco/bacteria_odb9/ \
-c 12
This seems a bit complicated, so let’s go over what we did. Essentially, we had to modify some variables to point to the augustus configuration. Because we are working on the HPC, it means that we don’t have “write” permissions to that configuration folder (something that BUSCO requires). As such, a work around is to make a local copy of the augustus configuration (used for ab initio gene finding in BUSCO) in our local directory and point to it using the “AUGUSTUS_CONF_PATH” variable.
Time to work in groups and compare the metrics!
Now, that we have assessed the assembly metrics, we will examine the output from Quast and BUSCO, and look for the number of predicted core genes in addition to the scaffold composition.
Step 6: Annotating the assembly using PATRIC
Now that we assembled, improved, and selected our “best” performing assembly, we can proceed to annotating and visualizing our organism. Since this is a small prokaryote genome, we can use an online annotation portal called PATRIC.
Once you navigate to the PATRIC homepage, you will first need to create a free account and register. We can then proceed to uploading our data to the PATRIC portal and annotate our genome.
For your reference, we have added 2 screen capture videos of creating an account, uploading, analyzing, and navigating the analysis tools using PATRIC below.
Remember, you will only need to upload the fasta file of the assembly, there is no need to upload your reads or any other files generated during this tutorial.
Have fun exploring your genome!