Installation
To view detailed installation instructions you may visit the Docker website. For this tutorial we have taken out much of the details and provided you with the commands you will most likely need.
MacOS
All you need is to download the dmg here. Alternatively you will need to visit the Docker Hub website, create an account, and download it there.
Windows
Download Docker for Windows Installer.exe and follow the installation instructions.
Linux
For this tutorial we will assume that you are running Ubuntu. If you are running a different flavor of Linux please refer to the installation page on Docker Hub.
Set up the repository
sudo apt-get update

sudo apt-get install \
    apt-transport-https \
    ca-certificates \
    curl \
    gnupg-agent \
    software-properties-common

curl -fsSL https://download.docker.com/linux/ubuntu/gpg | sudo apt-key add -

sudo apt-key fingerprint 0EBFCD88
Output from the apt-key command should be the same as the output below
pub   rsa4096 2017-02-22 [SCEA]
      9DC8 5822 9FC7 DD38 854A  E2D8 8D81 803C 0EBF CD88
uid           [ unknown] Docker Release (CE deb) <docker@docker.com>
sub   rsa4096 2017-02-22 [S]
If all is good then set up the stable repository
sudo add-apt-repository \
   "deb [arch=amd64] https://download.docker.com/linux/ubuntu \
   $(lsb_release -cs) \
   stable"
Install Docker CE
Now that you have linked the Docker repository you must update your list of repositories so that you can then install via apt-get.
sudo apt-get update

sudo apt-get install docker-ce docker-ce-cli containerd.io
Validate the Installation
In order to test that your installation was successful we must run the hello-world command using docker on the command line. To do so, open your terminal and run the following command.
Note: Linux installations will most likely need to run all docker commands as sudo
docker run hello-world
You should see the following output describing what just happened:
Hello from Docker!
This message shows that your installation appears to be working correctly.

To generate this message, Docker took the following steps:
 1. The Docker client contacted the Docker daemon.
 2. The Docker daemon pulled the "hello-world" image from the Docker Hub.
    (amd64)
 3. The Docker daemon created a new container from that image which runs the
    executable that produces the output you are currently reading.
 4. The Docker daemon streamed that output to the Docker client, which sent it
    to your terminal.

To try something more ambitious, you can run an Ubuntu container with:
 $ docker run -it ubuntu bash

Share images, automate workflows, and more with a free Docker ID:
 https://hub.docker.com/

For more examples and ideas, visit:
 https://docs.docker.com/engine/userguide/
Congratulations! You’ve now got docker installed and working. Let’s move on to some cool stuff!
Pre-Built Docker Images
When setting up a particular environment with Docker you have two options on how to proceed:
- Configure it yourself (pretty tedious and not too fun)
- Grab a prebuilt image and modify if needed (preferred).
Docker Hub is a great resource for finding pre-built docker images that will save you from doing most of the leg work. Not only are there hundreds of thousands of publicly available options to choose from, you can also share your own images!
As seen in the hello-world example output, docker run contacts Docker Hub, looks for a prebuilt image called “hello-world” and (if it exists) it will essentially download that image to your computer and will execute the startup commands.
Now that we know the order of operations, let’s start by checking to see if there are any Jupyter images currently available. You can find a list of stacks available on both Docker Hub as well as Jupyter’s Docker page.
Let’s start out by grabbing the basic Jupyter Notebook image:
docker run --rm --name jupyter -p 8888:8888 jupyter/minimal-notebook
The -p option binds the host port to the container’s port which is necessary in this instance. --rm automatically removes the container when it exits. This is good practice to prevent future headaches.
You can check to see that it is running by using docker ps:
$ docker ps                                                                                                                                                                                           ⏎
CONTAINER ID        IMAGE                      COMMAND                  CREATED             STATUS              PORTS                    NAMES
04af1ce8822c        jupyter/minimal-notebook   "tini -g -- start-no…"   23 minutes ago      Up 23 minutes       0.0.0.0:8888->8888/tcp   jupyter
The CONTAINER ID is how you can access this particular image instance. With this you can kill the image docker kill 04af1ce8822c, but leave it for now.
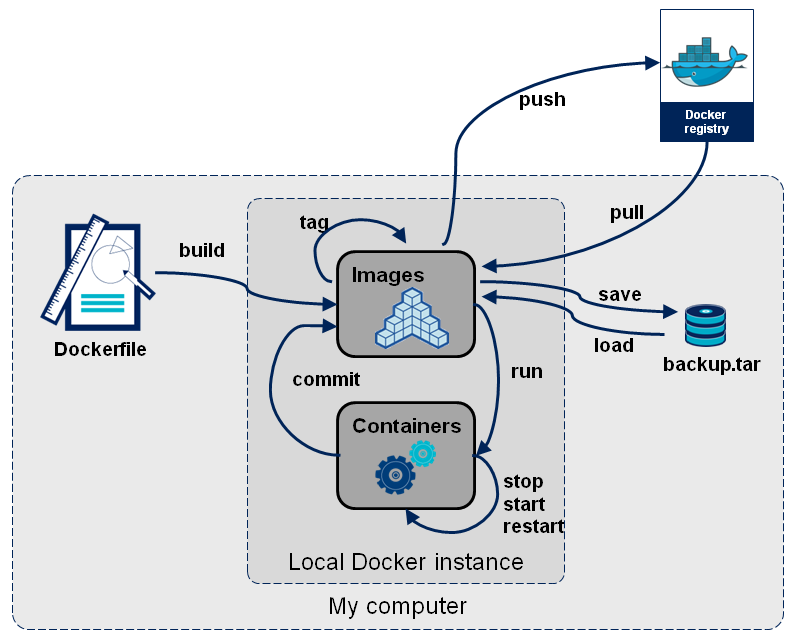
Docker Image Workflow
Important to understand what just happened to make the best of what Docker has to offer. To summarize, Docker Hub hosts a plethora of prebuilt, immutable images which we can pull onto our local machine and run. A container is an instance of an image which can then be modified, rebuilt, and executed. In the next section we will be dealing primarily with containers.
Accessing Your Container
Containers can be accessed in a couple of ways, depending on how they’re configured as well as what purpose they serve. Since this particular container is hosting a Jupyter Notebook we will most likely want to access via a GUI.
Access via Web Interface
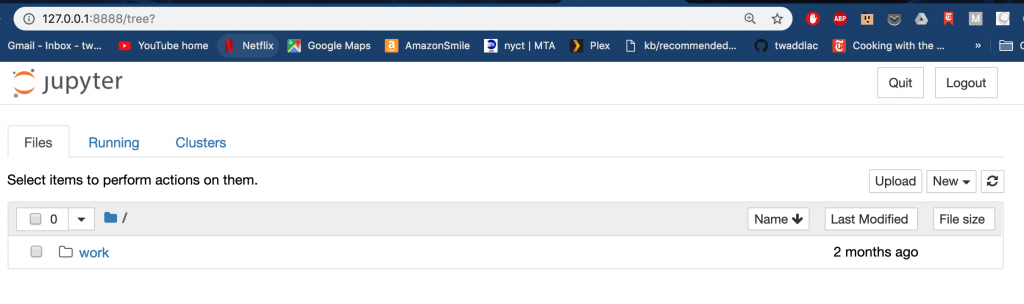
The output from the docker run command provided you with a URL which you can use to access via a web browser. It is running locally and thus can be accessed by visiting 127.0.0.1:8888. Note that you will need to copy and paste the alphanumeric token that is output in your terminal after running the docker run command as this is the password for the Jupyter notebook. Play around with the notebook to make sure it works as expected.
Upon successful login you should see a familiar interface. If you are not familiar with Jupyter Notebooks then please see our tutorial.
Access via Command Line
There will be instances where your container has no graphical interface or you need to make changes while it is running. To do so Docker provides an exec subcommand to make this possible. Not only can you access your container but you can send commands to the container.
For now we will access this via the command line. To do so you will need the container ID.
* NOTE your container ID will be different for every container so copying and pasting this will not work!
docker exec -it jupyter bash
-
-itells docker that you would like an interactive session, so you will actually enter the container. -tis defining the name of this particular container (aka a tag) by which we access it.bashis the command to run upon entering the container, which is essentially a terminal environment.
Take some time to look around and test it out. Do all the commands work? Is there anything missing?
Try ping google.com. So I can just install ping right?
sudo apt-get install ping doesn’t work though? Needs a password?
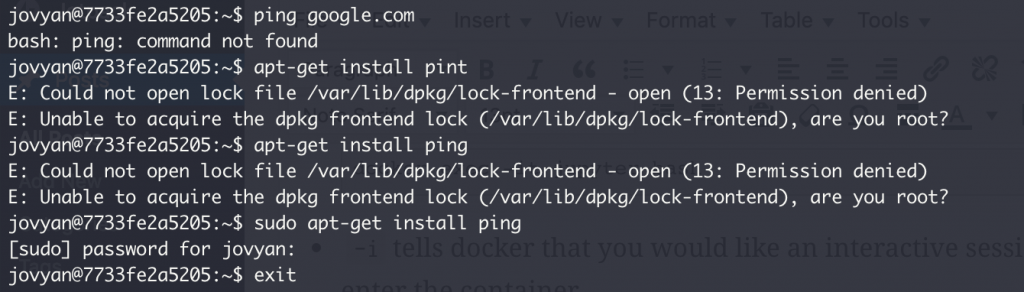
This is a common issue when dealing with images; often they don’t have everything we need so we need to install them ourselves but there are passwords that are unknown. One way to overcome this is to enter the container as sudo so that you can modify the container as needed.
Type exit or ctrl+d to exit then run:
docker exec --user root -it jupyter bash
Defining the user as root instead of jovyan will enter the container as su so you can proceed as normal.
apt-get update
apt-get install inetutils-ping
ping google.com
Modifying the container in this manner is ideal for testing purposes. However, what if you want to always have certain packages or configurations every time you run the container? What if you want to publish the image exactly as it is in the current instance? Thankfully there are configuration files for this!
Dockerfiles
EVERY docker image must contain a Dockerfile in order to build an image. You didn’t see one when we pulled from because that image was already built – a requirement for pushing to Docker Hub. Dockerfiles, in this instance, are useful for defining a base image and then modifying it as you deem fit.
The documentation is quite thorough and can be referenced here. In this tutorial we will simply configure the dockerfile to include ping upon starting the image.
Let’s start by creating a brand new directory on your local machine: mkdir jupyter. Enter this directory and create a Dockerfile: touch Dockerfile. NOTE: Every Dockerfile must be named as Dockerfile (case sensitive), no exceptions.
Now, consider the Dockerfile as a layered configuration that describes what exactly you want in your environment, while layering meaning that every subsequent instruction is applied to the previous instructions (called stacking). There is a specific format to adhere to and you can reference the best practices for further details and use cases.
Consider the following Dockerfile:
# Describes the base image from which to stack further instructions
FROM ubuntu:15.04

# Copies files from your current local '.' directory to the image path '/app'
COPY . /app

# Provide an instruction to the build instructions.
# Build instructions are executed before the container instance is executed.
# This example is building the app that will be the main service of this container
RUN make /app

# Specify the command to run upon executing the container post-build
# i.e. the exec command used in the previous exercise.
CMD python /app/app.py
Every instruction follows the same format: INSTRUCTION arguments. So COPY is the instruction and . and /app are the arguments.
Building an Image
Once your Dockerfile is ready to go, you’re ready to build your modified image! To do so, docker provides a build command that looks for a Dockerfile in the specified directory. It is also best a good practice to tag each build if you plan on keeping these images around and/or distributing/maintaining (think of this as versioning software).
docker build -t test .
This may take some time to build as it has to download the image from the repository and then run the set of build instructions. Upon successful build you can then run the image using the docker run command.
Adding Data to an Image
Being the expert data analysts y’all are, it’s common that we’ll have lots of data we need to work with. Adding it to the image sounds easy, right? It’s the COPY command you learned. Well it depends; it is named COPY because it does just that, so for smaller files this is fine (think scripts, small csv files, etc.). However, what happens if you’re analyzing sequence data and the files are > 20GB? It takes forever to copy outside of docker!
Behold volumes. Volumes allow a particular directory or directories to be accessed via the docker container without copying the entire dataset into the container itself. The only real drawback is that the content within the mounted directories is not packages with the image, though the data are persisted, meaning that if the instance is killed the data will be accessible upon a restart.
Let’s give it a shot!
Notice how there is only the work directory in the login page of your Jupyter notebook. Let’s add a test file and see if we can get it to show up in the notebook.
Kill the container then create a file named test in your current directory. Using the same docker run command, add the volume command:
docker run -v "$PWD":/home/jovyan/work --rm --name jupyter -p 8888:8888 jupyter/minimal-notebook
-v is the argument for adding a volume to the container, with the syntax being host_directory:container_directory. This command adds everything from the local current working directory to the container’s directory. Now visit the work directory in your notebook:

Test Your Skills!
Now that you’ve went through the basics of how to get up and running with Docker see if you can set up a custom container yourself:
- Add the
pingcommand to the Jupyter image you downloaded at the beginning of this tutorial - Build the image
- See if ping works